Soren's Purple Plate

Babies, kids, and parents eat together. Simple, healthy food ideas.

  • Home
  • Recipes
    • Breakfast
    • Main Meals
    • Fish & Meat
    • Vegetarian & Vegan
    • Soups & Stews
    • Treats & Snacks
    • Smoothies & Drinks
    • On-the-go & Travel
  • First Foods / BLW
  • Outside the Kitchen
    • Interesting Moms
  • About
    • My Eating Beliefs

TEA FOR KIDS

March 16, 2017 by Natasha Leave a Comment


The winter here in New York is getting the best of all of us. It’s March and everyone is so thirsty for some sunshine yet the city was just covered by three feet of snow. Fun for one afternoon of excitement and sledding if you live by the park but not so fun going anywhere when it’s impossible to cross the streetdqs. It’s also freezing. Anyway, it’s just winter. We’ll get over it.

My family has been stuck indoors for a week now with a serious virus. Everyone is coughing and sneezing. We are now past the temperature point but throats still need soothing. Mom and Dad have been drinking tea all along but kids can be funny with it, right? Will yours drink tea? What kind?

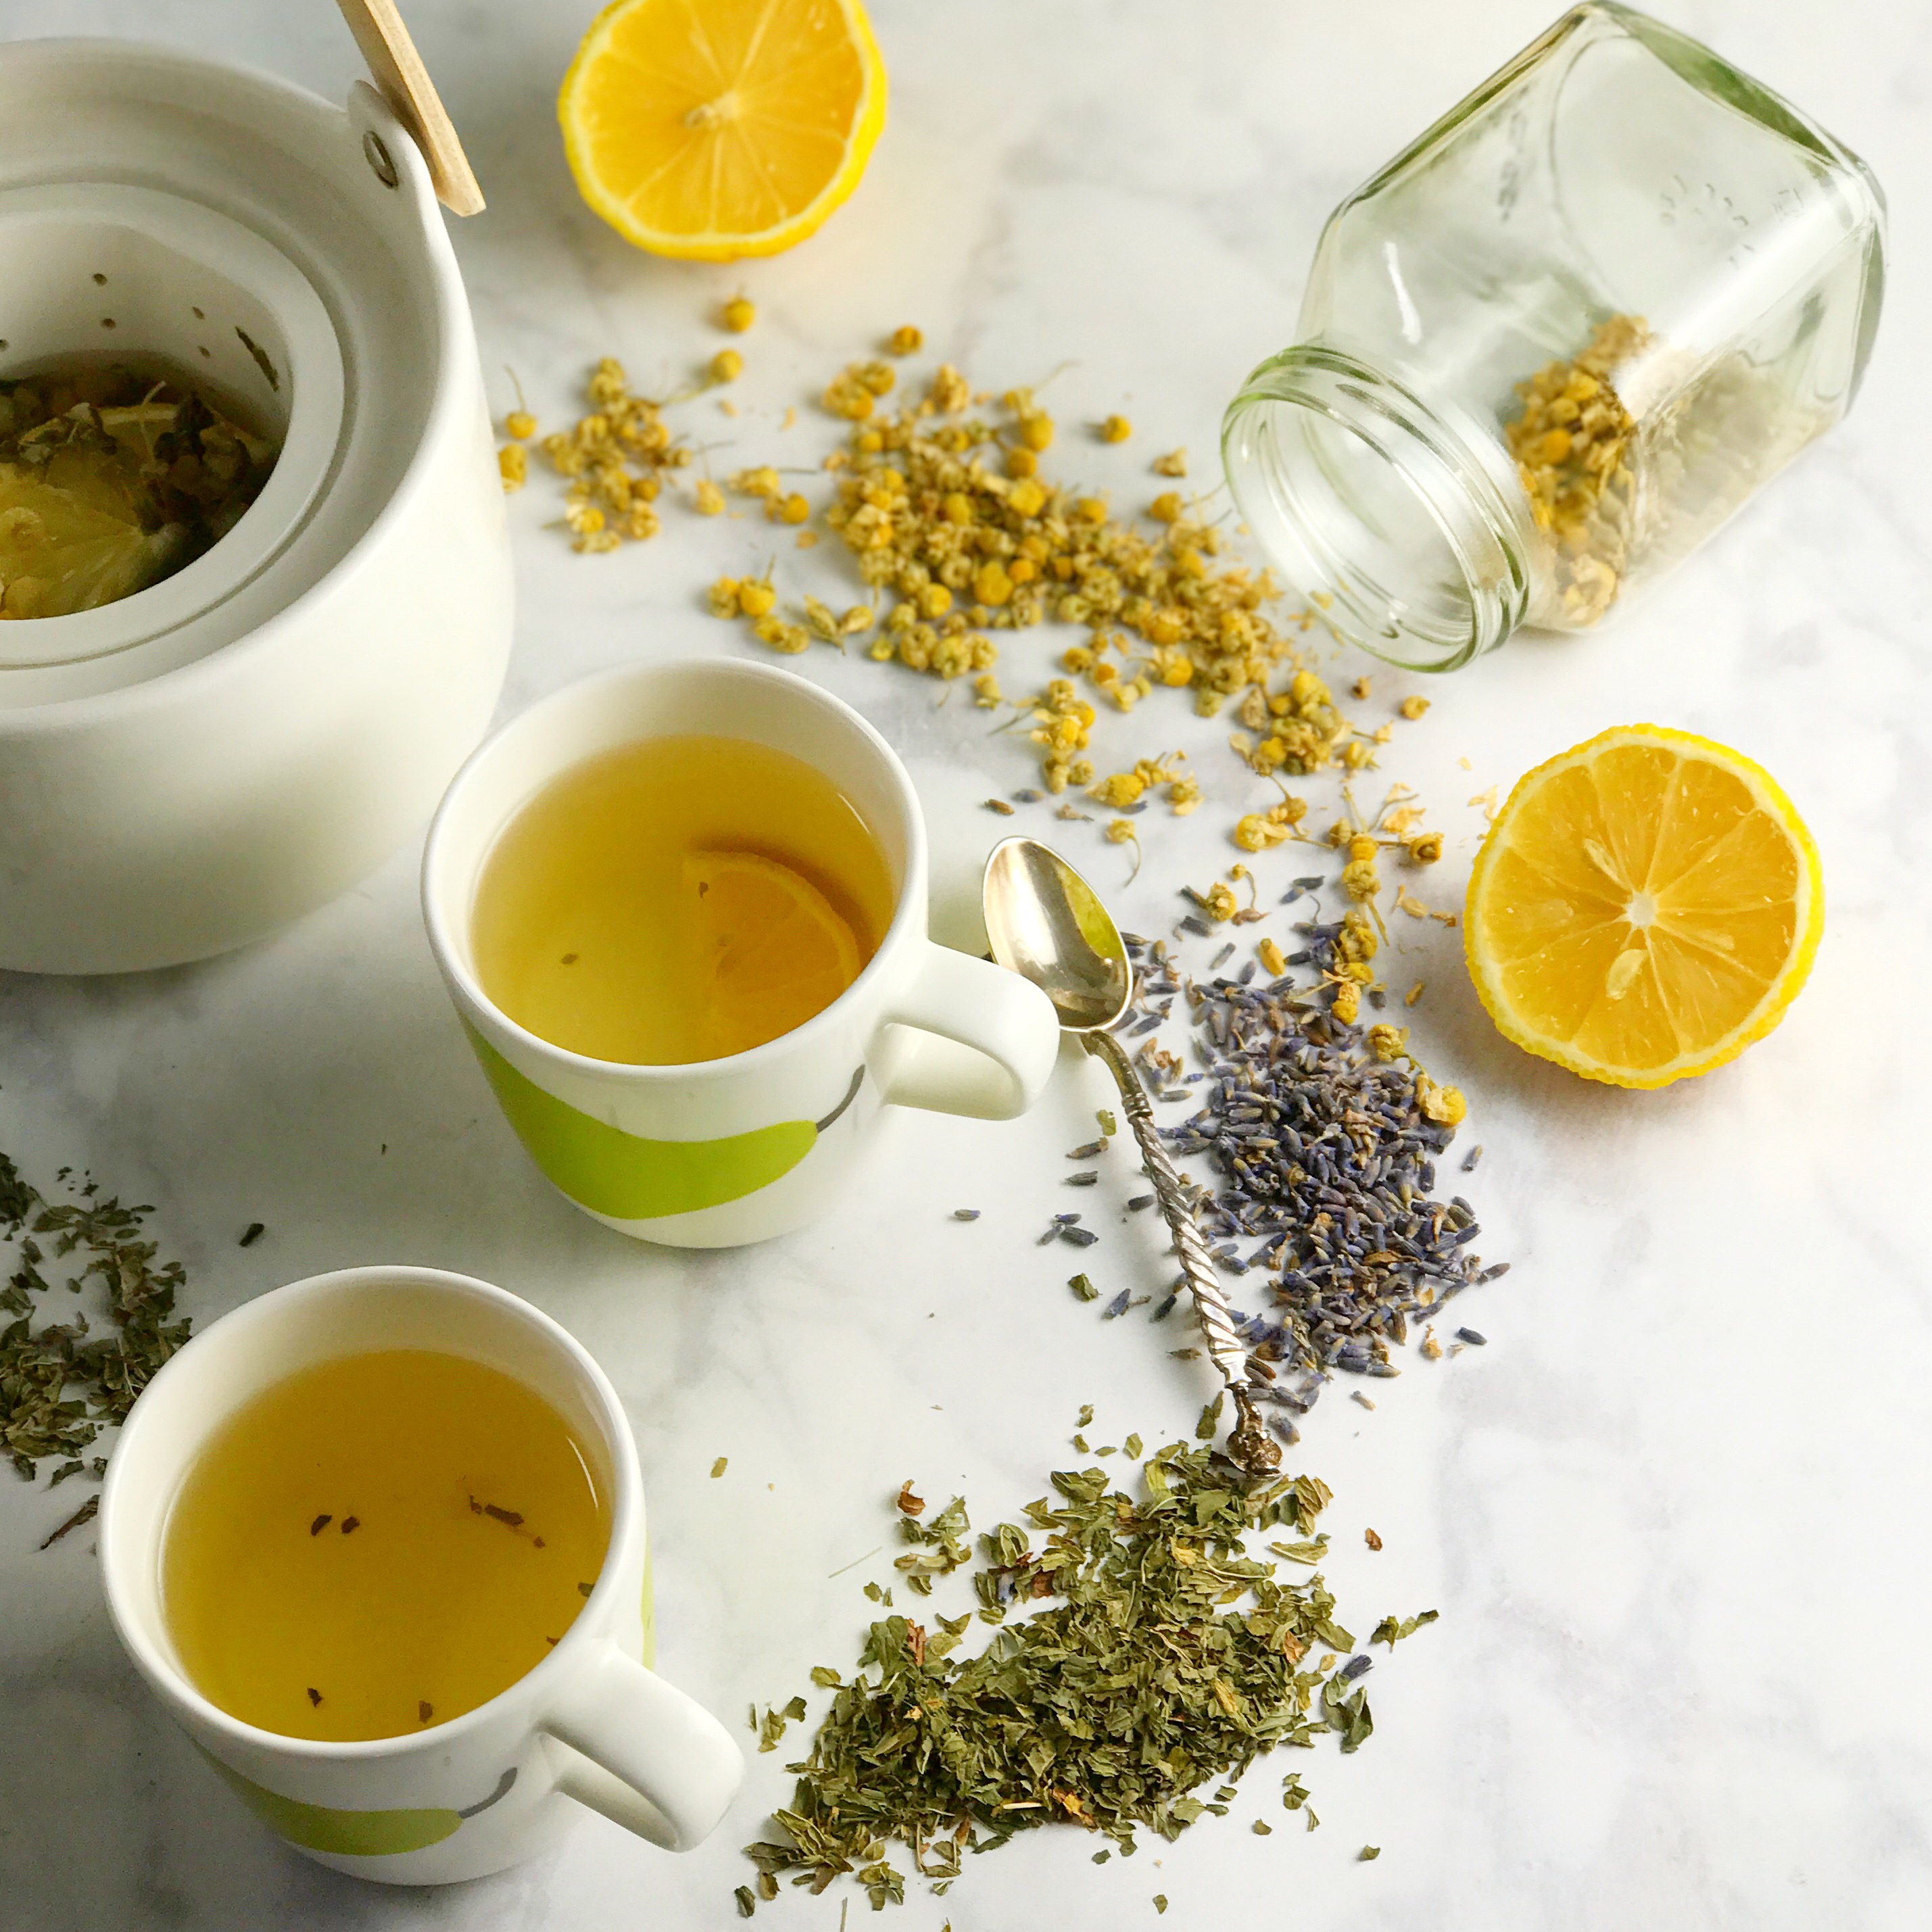
Soren, my 2.5 year-old, refuses ginger no matter how I tried but I finally found a blend that he likes. I make my own blend with the loose herbs rather than brewing a ready-made bagged tea. I know exactly what goes into it and how much.

CAMOMILE, SPEARMINT and LAVENDER are considered safe for children. They calm the nervous system as well as comfort during a cold. I make a mild tea with 50% camomile, 40% mint and just a dash of lavender.

Add honey, squeeze some lemon and you have a wonderful warm drink for sick kiddos. Splurge on the honey to increase the chance of your kids liking it.

Filed Under: Smoothies and drinks

QUINOA VEGGIE CUPS

March 14, 2017 by Natasha 2 Comments

This week I’m very honored to be a guest at #HealthyKidsCommuity. If you don’t know, it’s an amazing INSTAGRAM community of parents who put healthy meals for the family and especially children at the top of their priority list. You can find lots of healthy recipe and food ideas. These people are very creative. It’s my constant source of inspiration.

Unfortunately, instead of loosing myself in creativity over a superb family meal (the theme of the week), I have been dealing with winter and the entire family being sick. Happens to all of us, right? Not having much time on hand, I prepared these tasty quinoa cups that everyone can enjoy: kids for dinner and parents as an appetizer or even dinner if you throw in a little salad.


When cooking quinoa, I added a tablespoon of turmeric for extra immunity boost and, of course, color. Leftover quinoa is an ideal way to prepare these little cups as it really won’t take you much time at all.

They are absolutely delicious when warm but held up the flavor pretty well when reheated the next day.


QUINOA VEGGIE CUPS
 
Save Print
These super healthy quinoa cups are a fast and easy dinner for children. Add a teaspoon of turmeric to quinoa for extra immunity boost and color.
Author: Natasha @ Soren's Purple Plate
Ingredients
  • ​
  • 2.5 cups cooked quinoa
  • a few broccoli florets
  • 2-3 spring onions
  • 1 small zucchini
  • 2 eggs
  • ½ cup shredded mozarella cheese
  • ⅓ tsp dried basil
  • Salt/pepper
Instructions
  1. ​Wash and chop all the vegetables. Combine them with quinoa.
  2. In a separate bowl beat the eggs by hand and add salt, pepper, dried basil, and cheese.
  3. Pour the egg mixture over quinoa and mix well.
  4. Bake in muffin tins (using either silicone or paper liners) for 20-25 minutes at 350F.
Notes
I have a convection oven so everything cooks faster there. You might want to cook yours a little longer in the regular oven.
Also you can use any cheese you like instead of mozzarella.
3.5.3208


Filed Under: Main meals, On-the-go / travel food, Recipes, Vegetarian / Vegan / Raw

Almond Oat Peanut Cookies

October 16, 2016 by Natasha Leave a Comment

Almond Oat Peanut Cookie

Hello, my perfect cookie, which just happens to be gluten free and vegan.

There are as many perfect cookies as there are people. My perfect cookie depends on what mood I wake up in and the weather. This one, my friends, I can eat in any season and any mood because it’s crunchy, healthy, mildly sweet and oh-so-toddler-approved.

I played with Barnerybutter.com recipe and changed a few things around, mainly reducing sweetness and adding peanut butter.

I have to warn you, the dough was a bit too crumbly and I doubted the cookies would hold together but they so did!

Another important thing: I used real peanut butter, the one you make yourself in stores like Whole Foods. It’s dry and made of just one ingredients – peanuts. If you are using the runny peanut butter from a jar, then definitely put less of it in the dough.

Almond Peanut Oat cookie

Almond Oat Peanut Cookie


Almond Oat Peanut Cookies
 
Save Print
These healthy cookies are crunchy, mildly sweet and oh-so-toddler-approved. They also happen to be vegan and gluten free.
Author: Natasha @ Soren's Purple Plate
Recipe type: sweets
Ingredients
  • 2 cups rolled/old-fashioned oats
  • 1 cup almond flour/meal
  • ½ cup coconut flakes
  • 1 tsp cinnamon
  • ⅓ tsp salt
  • 1 tsp raw vanilla powder (or extract)
  • ½ cup peanut butter
  • ?
  • ¼ cup melted coconut oil
  • ⅓ cup maple syrup
  • ?
Optional: chocolate chips, nuts, hemp seeds, chia seeds
Instructions
  1. Combine all the dry and wet ingredients in two separate bowl. For me peanut butter was a dry ingredient. If yours is runny, it will be a wet ingredient.
  2. Mix all together. I used my hands to crumble peanut butter and mix everything well. My dough was crumbly but sticky enough to form little balls.
  3. Stir in all the optional ingredients now.
  4. With your hands form little balls, flatten them and place on a tray lined with parchment paper.
  5. Bake at 350F for 15-17 minutes. Let them cool before trying.
3.5.3208


Filed Under: Recipes, Top recipes, Treats, snacks, desserts

Crispy Coconut Chicken

September 21, 2016 by Natasha

Coconut Chicken

Hello yummy crispy coconut chicken! It’s made of healthy ingredients but it’s fried.

I would like to state  that I would not offer this chicken to a baby under 1. Yes, I am a fan of Baby Led Weaning (what is it?) but Baby Led Weaning can be as healthy or unhealthy as you make it to be. Babies can be given the most greasy foods right at 6 months and, technically, it would be considered BLW. The main premise is that you offer your child whole foods (large chunks instead of purees) and leave them to be independent eaters (rather than spoon-feeding them from 6 months.) So there. My philosophy is – healthy foods at any cost.

That said, my son is now approaching his SECOND Birthday and I have to admit I definitely have relaxed a lot more about what foods he eats. His appetite is still good but the food preferences are there, sometimes very strong, like a plate can fly high into the air and spill all over the carpet and couch if he doesn’t like what’s on it. I used to be a purist when it came to baby food and I am glad I put the effort. I think it’s paying off already. But at this point, Soren eats a lot more traditional kids foods.

On to the recipe

If you use a non-stick pan, you can make this chicken with minimal oil. If you would like to achieve maximum crispiness, then it’s better to use a regular pan with a considerable amount of oil (however much you need for the chicken not to stick).

It won’t be crispy:

  • if you cover the pan with the lid
  • if you refrigerate
  • if you use too low heat

Crispy or not, it’s still delicious.


Coconut ChickenCoconut chicken


INGREDIENTS:

2 large chicken breasts
2 eggs
1/2 cup flour (I used whole wheat)
1 cup unsweetened coconut shreds
1/2 cup panko (Japanese breadcrumbs)
Coconut oil

METHOD:

1. Prepare 2 plates: one with flour and one with coconut mixed with panko. Beat the eggs. Prepare a pan with coconut oil. If you want really crispy chicken, then use a regular pan (not a non-stick) and use quite a bit of coconut oil.
2. Cut the chicken into thin strips. Season with salt and pepper. Dredge in flour first, then dip in egg mixture, then dredge in coconut shreds mixture.
3. Pan fry for 8 minutes on each side. If you used a lot of oil, then place the cooked chicken on paper towel to absorb excess oil.


Crispy Coconut Chicken
 
Save Print
Author: Natasha @ Soren's Purple Plate
Ingredients
  • INGREDIENTS:
  • 2 large chicken breasts
  • 2 eggs
  • ½ cup flour (I used whole wheat)
  • 1 cup unsweetened coconut shreds
  • ½ cup panko (Japanese breadcrumbs)
  • Coconut oil
Instructions
  1. Prepare 2 plates: one with flour and one with coconut mixed with panko. Beat the eggs. Prepare a pan with coconut oil. If you want really crispy chicken, then use a regular pan (not a non-stick) and use quite a bit of coconut oil.
  2. Cut the chicken into thin strips. Season with salt and pepper. Dredge in flour first, then dip in egg mixture, then dredge in coconut shreds mixture.
  3. Pan fry for 8 minutes on each side. If you used a lot of oil, then place the cooked chicken on paper towel to absorb excess oil.
3.5.3208


Filed Under: Fish and Meat, Main meals, On-the-go / travel food, Recipes

Vegan French Lentils with Rice

September 16, 2016 by Natasha Leave a Comment

20160913-dsc01443

This simple vegan dish used to be my go-to dish when I was just starting Baby Led Weaning with Soren (what is Baby Led Weaning?) Luckily, he liked almost anything I put in front of him in those days. Now that he is nearing his second birthday, he is still a very good eater but he is definitely more selective than he used to be. Nevertheless, whenever I make lentils, he is eager to eat them at least once. He can refuse the same dish if I offer it again the same or the next day.

Lentils and Rice are considered a complete protein. What is it? Keep reading.

A Complete Protein

Simply put, our body needs a full range of amino acids (building blocks of  protein) to function properly. 12 of them we produce ourselves but 9 additional ones, which are called essential amino acids, we need to get in adequate amounts from food. Animal protein is usually considered a complete protein, meaning it contains all 9 of the essential amino acids. In the plant world, quinoa and buckwheat are among the few vegan complete proteins. Many other plant food contain several essential amino acids but not all 9 in one plant. It is easy to achieve a complete protein if you combine legumes and grains. It’s a generalization but the idea is that: rice and beans make up a complete 9 amino acids that we need.

On to the recipe…

If you make a dish like this, you can skip meat and rest assured that you kid is getting all the protein he/she needs. Adding as many vegetables as you have will make it into a sort of nutrition powerhouse. I used mushrooms, celery, carrots and onions. This  dish doesn’t have sophisticated flavors but it makes for a nice, healthy, earthy, and a satisfying meal.

20160913-dsc01445

Ingredients:

  • 1 cup french lentils
  • 1/2 cup rice (white or brown)
  • 1/2 yellow onion
  • 3-4 garlic cloves
  • 3 celery stalks
  • 3 carrots
  • 5-8 mushrooms (of your choice)
  • Optional but good: 1 tbsp of butter

Method:

  1. In a medium pot, heat up a little oil (I used avocado oil). Sauté finely chopped onions and garlic for 5-8 minutes. Add sliced mushrooms. Continue sautéing for 5 more minutes. I like seasoning a little with salt and pepper at this point and adding the butter.
  2. Add finely chopped celery and carrots ( I like cutting in circles). Stir. Sauté for 5 minutes.
  3. Add french lentils, very well rinsed. I don’t usually soak lentils but you can (for 2 hours minimum) to speed up the process a little. Pour enough water to cover the lentils by an inch. Bring to a boil and simmer on low heat for 5 minutes. Then add the rice. Continue cooking everything on low heat for 25 minutes. If you feel like the water is evaporating too soon, add a little more. Season with salt. Turn off the heat and let sit under cover for 5-10 minutes.

NOTE: Don’t season with salt while cooking as it will make lentils hard.

20160913-dsc01441


Vegan French Lentils with Rice
 
Save Print
If you make a dish like this, you can skip meat and rest assured that you kid is getting all the protein he/she needs. Adding as many vegetables as you have will make it into a sort of nutrition powerhouse. I used mushrooms, celery, carrots and onions. This dish doesn't have sophisticated flavors but it makes for a nice, healthy, earthy, and a satisfying meal.
Author: Natasha @ Soren's Purple Plate
Ingredients
  • 1 cup french lentils
  • ½ cup rice (white or brown)
  • ½ yellow onion
  • 3-4 garlic cloves
  • 3 celery stalks
  • 3 carrots
  • 5-8 mushrooms (of your choice)
  • Optional but good: 1 tbsp of butter
Instructions
  1. In a medium pot, heat up a little oil (I used avocado oil). Sauté finely chopped onions and garlic for 5-8 minutes. Add sliced mushrooms. Continue sautéing for 5 more minutes. I like seasoning a little with salt and pepper at this point and adding the butter.
  2. Add finely chopped celery and carrots ( I like cutting in circles). Stir. Sauté for 5 minutes.
  3. Add french lentils, very well rinsed. I don't usually soak lentils but you can (for 2 hours minimum) to speed up the process a little. Pour enough water to cover the lentils by an inch. Bring to a boil and simmer on low heat for 5 minutes. Then add the rice. Continue cooking everything on low heat for 15 minutes. If you feel like the water is evaporating too soon, add a little more. Season with salt. Turn off the heat and let sit under cover for 5-10 minutes.
NOTE: Don't season with salt while cooking as it will make lentils hard.
3.5.3208


Filed Under: Main meals, Recipes, Vegetarian / Vegan / Raw

HEALTHY CHICKEN OAT MEATBALLS

September 6, 2016 by Natasha 2 Comments

Baby Led Weaning (what is it?) appropriate from 7 months if you omit salt.

Chicken Oat Meatballs

When I can, I try to grind my own meat. It sounds complicated but it actually is not at all and it takes just a few minutes. The only thing you would need to do is wash an extra piece of kitchen equipment. I know it sounds like  a hassle to most moms and dads who don’t have time for anything extra, but to me it is really worth it.

WHY GRIND YOUR OWN MEAT:

  • SAFETY: It is much safer to consume freshly ground meat versus the ground meat that has been sitting in the store for a few days (only very high-end stores grind their meat daily). Once exposed to air, it is more likely to be contaminated with bacteria. I honestly don’t even want to go into the bacteria topic, it’s so gross. There is plenty written about it online.
  • QUALITY: It tastes better and fresher.

HOW TO GRIND YOUR OWN MEAT:

I don’t have a special meat grinder (one day when I have a bigger kitchen, I’ll invest into something like this). I used to use my Vitamix but I found it was way too difficult to clean afterwards because the fibers of the meat would roll around the blade and get stuck. For a while now, I have been using my small, affordable kitchen helper Cuisinart Mini Prep Food Processor (view and buy it on Amazon). I use it for everything from chopping to making my own hummus, nut butter, tomato sauce, etc. It’s tiny and only costs $40.

To grind your meat, just cut it up into big chunks and pulse for 15-20 seconds. Don’t over process because you will get a very pasty mass, which would still work for meatballs but I prefer to leave meat with a little texture. For a big batch, you would need to grind in batches but it really takes little time.

Make sure to thoroughly clean everything afterwards in warm soapy water. Once done, I like to pour boiling water on all the parts for extra disinfection. Dry completely before putting away.


Onto the recipe…

It’s ideal to use steel cut or old-fashioned oats in this recipe. I’m a big fan of leftovers. Just make a larger than usual batch for breakfast and use whatever is left for this recipe.

These meatballs freeze well.

Chicken Oat Meatballs Chicken Oat Meatballs Chicken Oat Meatballs Chicken Oat Meatballs Chicken Oat Meatballs


HEALTHY CHICKEN OAT MEATBALLS
 
Save Print
These easy healthy meatballs are a perfect meal for babies, kids and adults. They are very quick to make and also freeze well. Use panko breadcrumbs for extra crunchiness and turmeric for extra health punch and color. Enjoy!
Author: Natasha @ Soren's Purple Plate
Recipe type: healthy meatballs
Ingredients
  • 1 cup cooked oats (I used the leftover steel cut)
  • 2 large chicken breasts or 1 lb ground chicken
  • 2 eggs
  • ½ onion
  • 1 garlic clove
  • 1 tsp turmeric
  • panko breadcrumbs (or any other breadcrumbs)
Instructions
  1. Mince or finely chop the onion. Mix all the ingredients well together reserving the breadcrumbs for later. Season with salt and pepper (unless preparing for babies under 1). The mixture will seem a little runny but once you dredge the meatballs in the breadcrumbs, they will hold up well.
  2. Preheat your large pan. I didn't have a non-stick available so had to use a bit more oil. Avocado oil is perfect for it since it has a very high smoke point.
  3. Form little balls and roll them in breadcrumbs. I love using Japanese panko breadcrumbs because they make the meatballs nice and crunchy. Any other breadcrumbs will do.
  4. Pan fry on medium heat for 8 minutes on each side. Place on a paper towel once done to soak up extra oil.
Notes
Panko breadcrumbs are Japanese breadcrumbs that add crunchiness and airiness to food.

Avocado oil and coconut oil are ideal for frying as they have very high smoke point.

Turmeric is a strong anti-inflammatory spice that is very mild in flavor and bright in color.
3.5.3208


Filed Under: Fish and Meat, Main meals, Recipes

Apple Ricotta Breakfast Tart

August 20, 2016 by Natasha Leave a Comment

Baby Led Weaning (what is it?) appropriate from 7 months or as soon as you offer whole eggs.

Apple Ricotta Tart

Good morning summer Saturday!

Almost 10 years later, I’m still trying to learn to ignore the humidity in this city of New York. Only a very good attitude can save you from it, I’m telling you. We are lucky to live close to the park and all the wonderful playgrounds have sprinklers but man, when you are 6 weeks away from giving birth and running around after your almost 2-year-old toddler, little can save you… Sorry, had to vent.

Onto the better things… For breakfast we usually alternate between eggs (think omelets, frittatas, boiled, fried, etc.), porridge of any kind (buckwheat, oatmeal, millet, quinoa) and pancakes (the thousand versions that I often feature on Instagram). And then there is RICOTTA! Ricotta and farmer’s cheese deserve its own breakfast category in my world. I grew up on farmer’s cheese so it’s pretty much in my DNA. Unlike the Italians who use it mainly in pastas, I love ricotta in pancakes, tarts and just on its own with fruit or honey.

CALCIUM requirement for kids:

1-3 years old – 700 mg per day

4-8 years old – 1000 mg per day

Guess what? Ricotta has 500mg in 1 cup (compared to 300 mg in 1 cup of milk).

My son doesn’t drink regular cow’s milk but he gets his calcium usually from leafy greens, fermented dairy products (yogurts, kefir), goat milk and ricotta and farmer’s cheese. I will dedicate a special post to dairy and calcium some other day.

Apple Ricotta Tart Apple Ricotta Tart Apple Ricotta Tart Apple Ricotta Tart

Now, about this tart. It’s mildly sweetened with one ripe banana and apples. It has zero processed sugar. It has lots of calcium and can serve as breakfast, snack, to-go food or dinner. You need to make it cool substantially for it to harden. Otherwise, you will most likely need a spoon to eat it. If warm, I like it with sour cream or yogurt.


INGREDIENTS:

1 ripe banana
1 cup ricotta
2 eggs
2 egg yolks
1/2 cup kefir
1 tsp baking soda
1/2 cup semolina flour
2 tbsp coconut oil
pinch of salt
cinnamon
1/2 tsp vanilla powder
1 apple

Optional: raisins, chia seeds, coconut shreds, maple syrup, honey

METHOD:

1. Mash the banana. Add ricotta and eggs. Whisk by hand. Add the rest of ingredients (except apple) and let the dough sit for 10 minutes for semolina to expand.

2. Oil up your baking dish. Pour the dough into it. Thinly slice the apple and arrange it on top. You can sprinkle with more cinnamon.

3. Bake at 350F for 25-30 minutes. I have a compact convection oven so it takes me less time to bake. The tart will be ready when the top is golden and the toothpick comes out clean. Might take you 30 mins with regular oven. Play with the time.


Apple Ricotta Breakfast Tart
 
Save Print
Zero processed sugar, this mildly sweet ricotta tart is a perfect breakfast tart for the entire family including babies from 7 months old if you are offering whole eggs. Calcium rich and guilt-free. Enjoy!
Author: Natasha @ Soren's Purple Plate
Recipe type: Breakfast
Ingredients
  • 1 ripe banana
  • 1 cup ricotta
  • 2 eggs
  • 2 egg yolks
  • ½ cup kefir
  • 1 tsp baking soda
  • ½ cup semolina flour
  • 2 tbsp coconut oil
  • pinch of salt
  • cinnamon
  • ½ tsp vanilla powder
  • 1 apple
  • Optional: raisins, chia seeds, coconut shreds, maple syrup, honey
Instructions
  1. Mash the banana. Add ricotta and eggs. Whisk by hand. Add the rest of ingredients (except apple) and let the dough sit for 10 minutes for semolina to expand.
  2. Oil up your baking dish. Pour the dough into it. Thinly slice the apple and arrange it on top. You can sprinkle with more cinnamon.
  3. Bake at 350F for 25-30 minutes. I have a compact convection oven so it takes me less time to bake. The tart will be ready when the top is golden and the toothpick comes out clean. Might take you 30 mins with regular oven. Play with the time.
3.5.3208

Filed Under: Breakfast, Recipes, Top recipes, Treats, snacks, desserts

Cashew Raspberry Mousse

January 19, 2016 by Natasha Leave a Comment

cashew raspberry mousse

This dessert/snack is Baby Led Weaning appropriate from 7 or 8 months if you skip maple syrup (provided there are no nut allergies in the family). I was nervous the first and second (and third) time I gave nut butter to Soren when he was around 7 months but everything turned out ok. Our pediatrician encouraged me to give him everything (except honey) right from 6 months. She said the latest research actually indicates that the sooner you start introducing foods that are thought of as allergens the better (again, only if you don’t have history of allergies in your family). I think Mom’s intuition will guide you  best.

If you are craving something sweet but have committed to a healthier diet this year, try this easy 3-ingredient homemade cashew mousse. Cashews are an abundant source of essential minerals (tons of copper, selenium, magnesium, phosphorous and zinc), which are necessary for a proper function of our body from the production of red blood cell to the brain development.

This creamy sauce can be eaten as a mildly sweet mousse when chilled, added to your oatmeal in the morning, you can dip pancakes in it or add it to smoothies. It lasts about 3 days in the fridge. I made it for Soren and I to snack on.

You can control the sweetness by how much maple syrup you add. The recipe below makes a mildly sweet mousse.

SOAKING CASHEWS:

Below you can see that cashews that have been soaked for 3-4 hours expand and become whiter. They also soften, which is perfect for blending and making all kinds of sauces and mousses.
soaked cashews
raw soaked cashews
Soaking nuts is very important. I won’t go into details on why since I’m not a nutritionist and many other sources can demonstrate it in depth. All I will say is that by soaking nuts and seeds you increase the amounts of nutrients your body can absorb since soaking breaks down the substance that usually inhibits the absorption.
blending raw cashews
Cuisinart mini food processor
raw cashew raspberry mousse

INGREDIENTS:

1 cup of cashews
1/2-1 cup fresh raspberries
1 tbsp of maple syrup

A pinch of salt

METHOD:

1. Cover cashews with plenty of water and soak overnight in the fridge.

2. Drain cashews and place in a blender with fresh raspberries. Add a pinch of salt and maple syrup. Blend on high until the mixture is smooth and creamy (no pieces of nuts or berries).

3. Spoon into ramekins or small cups and chill for 4 hours.

Cashew Raspberry Mousse
 
Save Print
This creamy sauce can be eaten as a mildly sweet mousse when chilled, added to your oatmeal in the morning, you can dip pancakes in it or add it to smoothies. It lasts about 3 days in the fridge.
Author: Natasha
Recipe type: raw, vegan, dessert
Ingredients
  • 1 cup of cashews
  • ½-1 cup fresh raspberries
  • 1 tbsp of maple syrup
  • A pinch of salt
Instructions
  1. Cover cashews with plenty of water and soak overnight in the fridge.
  2. Drain cashews and place in a blender with fresh raspberries. Add a pinch of salt and maple syrup. Blend on high until the mixture is smooth and creamy (no pieces of nuts or berries).
  3. Spoon into ramekins or small cups and chill for 4 hours.
3.5.3208

Filed Under: Recipes, Treats, snacks, desserts, Vegetarian / Vegan / Raw

Almond Sweet Potato PURÉE

January 19, 2016 by Natasha Leave a Comment

almond sweet potato puree

If by the end of the week you are, like most people, exhausted and don’t have the energy to think of what to make for dinner, here is a simple idea. Make a healthy sweet potato purée with almond milk. Throw in a piece of fish or chicken or salad and you are good to go.
That’s what we are having for dinner here.
.
TO BAKE SWEET POTATO:
.
Scrub and dry a couple of sweet potatoes with paper towels. Pierce all over with a fork (be careful not to hurt yourself) and bake in the preheated oven at 375F for 1 hour. You might need to bake a little less or more depending on the size of your potatoes.
.
almond sweet potato puree
.
TO MAKE PURÉE:
.
Cool off the potatoes (or bake them ahead of time), scoop the potato out of its skins and place in a bowl. If very soft already, just add 1/2-1 cup of almond milk (depending on how many potatoes you a using), a pinch of salt and mash with potato masher to mix well.
.
If you want the purée extra creamy and silky, then place the ingredients in a blender and give it a spin for 30 seconds.
.

Filed Under: Main meals, Recipes, Vegetarian / Vegan / Raw

Butternut Squash Rice Balls

January 17, 2016 by Natasha Leave a Comment


butternut squash balls

I think a life of a mom is so much easier if you have roasted/steamed vegetables in the fridge at all times. I roasted a butternut squash yesterday to make pasta sauce and to use for snacking. With the leftover half, I came up with these cute-looking snack balls. Spoon-feeding is certainly not as fun as eating with your hands. Add a little crunch with brown rice crisps (sugar-free) and your babies and toddlers will certainly approve.

I bought Whole Foods brand plain, unsweetened brown rice crisps. The package listed only one ingredient, which is a good product in my book.

If you have butternut squash already roasted then these snacks will take you  5 minutes to make. Not even.

butternut squash balls

butternut squash balls

HOW TO BAKE BUTTERNUT SQUASH

Honestly, just a year ago I had no idea how easy it was to bake whole butternut squash. I used to ruin my fingers trying to peel the quash and cut it into chunks before steaming or roasting.

Preheat oven to 350F. Wash the squash. Dry with paper towels. Cut lengthwise. Place cut side down on parchment paper. Roast for 1 hour. In the middle of roasting, add a little water to the baking tray. That’s it.

Butternut Squash Rice Balls
 
Save Print
This is an ideal healthy snack for kids and people of all ages. Making it with leftover butternut squash will take you 5 minutes to prepare.
Author: Natasha
Ingredients
  • Just 2 ingredients:
  • Roasted butternut squash
  • Brown rice crisps
  • Optional: coconut flakes
Instructions
  1. Scoop the chilled squash out of its shell.
  2. Mash it with a fork (it should be very soft).
  3. Add as many rice crisps as necessary to make the mixture stick to together.
  4. Form little balls with your hands and roll in a bowl with coconut flakes.
3.5.3208


Filed Under: On-the-go / travel food, Recipes, Top recipes, Treats, snacks, desserts, Vegetarian / Vegan / Raw

  • 1
  • 2
  • 3
  • …
  • 5
  • Next Page »

Hi, I’m Natasha, Soren’s mom. Welcome to our own visual menu of healthy meals that everyone in the family can indulge in, including babies. Here you will find mainly my own creations but also recipes discovered elsewhere, tested and enjoyed by my family. We are not vegetarians but most dishes are veggie-forward, often gluten-free and always free of processed ingredients.
A little more about me

STAY IN TOUCH

  • Facebook
  • Instagram
  • Pinterest

Instagram

Instagram did not return a 200.

Follow me for inspiration

Copyright © 2025 · sorenspurpleplate · All rights reserved